Sunday, 4 March 2018

Belle Epoque Ensemble, part 1

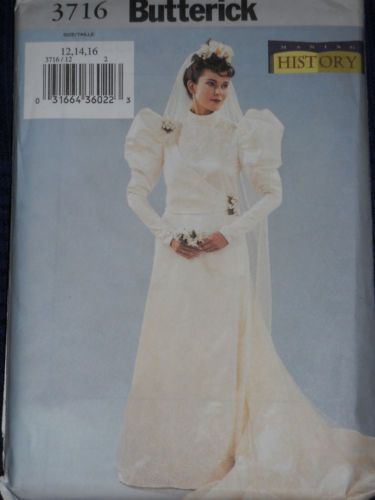
For as long I can remember I've always loved the jewelery from the Turn of the century/Belle Epoque/Jugendstil. The fashion however beautiful, I think is less becoming for my short and stout build and my age. So I've never really dared to make a Belle Epoque era costume, until now that is! A while ago, quite a while ago as costumes take a long time to plan, I fell in love with Butterick pattern 3716, the Victorian Bridal gown.


So when I could snatch it up for an afforable price I didn't hesitate. Now I am starting to wonder if it would have been wiser to wait a little londer. Why, you might ask yourself. Well I am still not sure whether or not I am bold enough to wear the leg-o-mutton sleeves, so characteristic for 1890's era. I am tempted to make them a little bit smaller.

After recieving the pattern I wasn't really happy with the construction of the bodice. So after some consideration I bought Laughing Moon #103, 1890's waist with four bodice and five sleeve options. Not only is this pattern more versatile but the construction is far more historically accurate.


With the pattern pieces for the skirt I encountered the same problem. Something that I did anticipate when I bought the pattern but I had hoped that it would be easy to work around them. The biggest issues with it? The skirt has a zipper and no walking or short train option. I think I am spoiled by all the great historical patterns available. The long train was taking up more fabric than I had and the pattern pieces were to wide for my fabric.

"Insert great big SIGH" Back to the drawing board it was! 

The easiest option would have been to purchase Laughing Moon #101 1890's Five gore skirt and I would have if I hadn't been flat broke.


The line drawing on the back of envelop reminded me of another pattern. One that I did own already, the Folkwear #209 Walking skirt. Which has a walking skirt length and a short train length.


I still didn't have enough fabric for a train but I'm not a big fan of those anyway, I am far too clumsy to wear one. The pattern pieces fitted my fabric and best part, no zipper required!The biggest difference between the two patterns is that the back of the folkwear skirt is gathered and the back of the Laughing Moon is pleated. I decided to go for a pleated back, it worked better with the velvet I was using and looks slightly more sophisticated in my opinion.


And then I got a chance to buy McCalls 7732 by the talented Angela Clayton, which is also from the 1890's era. The hasn't arrived yet but maybe I will be using elements of this pattern like the belt, undershirt or coat for this ensemble.


It's hard to judge a (very nearly) finished skirt pictured on a coat hanger but at least this way I get to show off the lovely colour of the fabric, Emerald green!

front

back

I cut the skirt the exact length of the pattern pieces. The bottom of the skirt ended up on the floor. I added a wide hem of different fabric to keep the skirt as long as possible. I am going to wear it at the Salon de la Societe raffinee, so it will be part of an elegant evening ensemble. 

The hand sewing of the wide hem in progress.
Front & back view.

Here are some of the inspirations for my outfit.

Edith Kingdon Gould in her red Worth dress, 
portrait by Théobald Chartran, 1898


Original dress from the portrait


Maria Feodorovna (Princess Dagmar of  Denmark) 
wearing a fur-trimmed red dress
 by François Flameng in 1894. 


(l) Portret of Louise van Loon - Borski painted by Alexandre Cabanel, ca. 1887.
(r) Original dress from the painting, attributed to Maison Worth, paris 1886

Posthumous portrait of Empress Elisabeth of Austria
 attribute to Joszi Arpad Koppay ca.1898 


and ofcourse  the list of inspirations would not be complete without, Scarlett O'Hara Red Velvet Ball Gown.


The conserved burgundy ball gown worn by Vivien Leigh 
as Scarlett O'Hara in Gone With The Wind.


The dress or me won't be anywhere near this dramatic I promise !


Wednesday, 28 February 2018

For the love of the Muff (part 3)

When I made my first muff in 2006, there were not many patterns available and very little information on the internet. I made a muff and cape set from an old faux fur coat from my husbands maternal grandmother.


Some years later, after purchasing this vintage/antique muff, I gave the cape and the muff to a friend.


When friends gave me a vintage 1950's/1960's polar fox stole (without head) I immediately knew I wanted to turn it into a white muff. To go with this jacket and hat! Although my trusty black muff looks quite well as well!


As I have always been happy with how my first muff turned out I used the same description which I found in 2006 floating somewhere on the internet.

"...I have some muffs from this period and they are made thus:
Make 2  tubes of muslin cut about 13/14" x21", one should be about 2" less
than the other.Stitch one end together and make a 3/4" chenille for elastic,
and fill with feathers (or you may opt for heavy poly quilt filler)Stitch
the open end; make a chenille as in the other end .
(you may wish to sew satin facings of about 6" oh each end of the inner bag
as the lining might show.
Cut and thread 2 pieces of elastic about 10" in the ends
Make a second (well, third) tube of fur, chenille, or other fabric of your
choice about 1" less than the tube already assembled, and cover the inner
piece.
Add a handle on one end, of silk braid or rope.
Embellish with tassels to taste...
"

I couldn't find the original source anymore but wanted to share this with you anyway because I found it really helpful. If you wrote this or you know who wrote this please let me know. I would be very happy to give you credit!

I did make some small changes when I made my second muff. For the first I used heavy poly quilt filler. To make this muff a little more historically accurate I used kapoc, a natural plant fibre. Which was oftend used in pillows and muffs. It has the added bonus that is not only more historically accurate but also warmer! 


The tubes where made from scraps of white cotton. The invisible one is striped, the visible one a nice satin weave.


I also decided to add a pocket. I had no idea how to do it and I am really bad at just winging it. So I decided to call in the cavalry in the shape of a workbook by Historical Sewing, the Faux Fur Muff pattern. I was very easy to follow and had very clear instructions, if you are thinking of make your own muff this would be a wise investment.

After putting the lining together it looked like this, in front of the lining is the polar fox fur.


You see that the tube has been filled but not sewn shut yet. Note: make sure you put in enough filling so that it can stand on a side without collapsing.


My new white muff turned out a little bigger than my vintage/antique black one. Although I suspect most of it is due to the fur being longer!


All in all it took about a week to complete this project and I am really happy with how it turned out!

Why the pocket in the muff, you might ask. It can be used for a wallet or a mobile phone but I use it to hold a hand/muff warmer.


My very small collection of vintage and antique muff warmers (small hot water bottles).

Unfortunately only one of them still works! The copper muff warmer leaks and the antique pewter muff warmer doesn't open anymore. And as hot water is in short supply at most of my Victorian themed events, I cheat and use a modern zippo handwarmer, which stays warm for 12 hours. This type of handwarmer was invented in 1923. 


Not just hot water bottles were used in the Victorian  and Edwardianera but also small charcoal burners, like these:

Visit for more information and pictures.


Interesting read.


Both are still available!

So Ladies no need for cold hands, let's keep them warm in style!


Tuesday, 20 February 2018

For the love of the Muff! (part 2)

The previous post has been all about the size of the muff and the eye candy in the shape of fashion plates. I choose to use fashion plates instead of pictures of antique muffs because it's much easier to see the size of the muff. However there are such wonderful orginal nineteenth century muffs out there, that I can't resist the urge to show some of them.

Flamingo feather muff lined with sheep skin.
1800-1825

Shawl and Muff set of fur, American
1820-1840


Pelerine and Muff set of Osterich feathers, French 
1830-1840

Fur Shawl and Muff, British
1855

Peacock feathers, ermine and linen muff, French
1860-1870

Silk evening muff, American
1880 - 1889

Wool and silk muff, decorated with wings of a bird.
ca. 1886

1890's Ermine Cape and Muff

Silk shawl and muff set, French
ca. 1895

Worth Walking Suit with Large fur muff
ca. 1905

Muff are still quite easy to buy here in the Netherlands. There are usually some for sale on Marktplaats and they are still being sold at antique and collectors fair. Even after looking at a whole lot of images I find it hard to distinguish the vintage from the antiques. Muffs stayed in fashion untill the 1950's/1960's and I suspect most muffs you can find are from that era. Having said that, there are some real gems out there, like these two currently sold at Marktplaats. They look like the real deal to me but I lack the knowledge to be sure. I escpecially like the fact that they both still have their original boxes.


If you want a muff buying is not your only option! There are lots of tutorials on how to make a (faux) fur muff. And if you don't want a fur muff you can also crochet or knit one!


Crochet Muff
Godey's Lady's book, February 1863


And if you are interested be sure to read A knitted muff from 1847 from the blog The Fashionable Past. 


Seller schmetterlingtag has often antique crochet and knitting patterns up for sale on Ebay. 

This is all I have time for today, more on how I made my own fur muff, next time!


Thursday, 15 February 2018

For the love of the Muff! (part 1)

Ever since I can remember I have loved the idea of owning and using a muff. I blame the Quality street tins my mother and grandmother owned for this. Actually I blame them for my entire obsession with costumes from the Victorian era.

This is not mine, I have two of them but both ended up in a box in the attic after we moved, but this is one of the two version we had when I was little. The picture of a lady with a muff was on the side if I remember correctly. I really want to know but I am not to fond of the ladder leading up to the attic and besides that I wouldn't know in whcih box they ended up...

 **Cue hours a me looking on the internet looking for the right version, seeing all the other wonderful Quality street tins and wanting to have them all.**

I mean it is hard to resist these beauties!

Okay, getting back to the original topic which is Victorian Muffs and not Quality Street tins and where to find them... (or how to collect them all!)


Muffs it is!

In Regency times the muff tend to be quite large. Although smaller ones were used as well.


In the 1830's they were still usually quite large


But it looks like they got smaller the closer you
get to the 1840's. This fashion plate is from 1837
and the muff here is quite small!


Around 1840-1845 the muff became the size I prefer, big enough to cover both hand when they are laid on top of each other and the wrists. Pretty, functional and most important manageble. It seems that the ladies from the Victorian era had the same preference because it stayed this size untill the Edwardian era, when the muff encreased in size again.

1841


1850

 1860


1874

1886

1891
source: http://archive.org/

1899

1907
source:De Gracieuse


Now that I had established that the size I wanted to make was in use for most of the nineteenth centuries I have in my historical wardrobe. It was time to figure out how to make one! But as this is quite a long post, with lots of eye candy, already. I'll write about it in the next blog.

Please note that I have been looking for documentation for the size, shape and sort muff I was planning to make. There are many more historically authentic styles and size. So if you want to make something else, don't be put off and do some research. You'll find that a lot is possible!