Showing posts with label costumes. Show all posts

Wednesday, 22 May 2019

1895 Belle Epoque Bicycle Jacket, a race against time

Cyclists around 1895

Sometimes I forget that making historical costumes is my hobby because it really starts to feel like work. Only far less enjoyable because I actually love my job! This has been the case since the start of the year.

I started off with the Porpentina Goldstein's Grey Coat from Fantastic Beasts and Where to Find Them. After that came a pair of Belle Epoque Linen summer pants for my son. I made a black velvet medici belt for fun.

Picture from: Ik kan kostuumnaaien ca. 1911

Made with a pattern part from McCalls M7732

 When that was finished  I found out that I hated the fit of my (previous) Belle Epoque Jacket and really needed a new one before the 30th of May. I know that a lot of people in the costuming community, seem to, enjoy sewing until the night before the event. I am not one of those people! I really hate the frustration and stress and that effects te quality of my work. I can't remember cursing, messing up or bleeding on a project this much in ages.

After not being happy with the jacket I made with Past Patterns #113, 1899 - 1910 Spectator Jacket. I decided to give Black Snail Patterns #0715 Bicycle Jacket about 1895 a try.


Black Snail #0715, Bicycle Jacket about 1895

The pattern from Black Snail looks an awful lot like an original from c. 1896-1898 in the MET.


Brown Wool Cycling Costume with Divided Skirt, c. 1896-1898, American, 2009.300.532a-d, Brooklyn Museum Costume Collection at the Metropolitan Museum of Art, Gift of the Brooklyn Museum, 2009; Mr. and Mrs. Morton Sultzer, 1979


And even more like this original brown woollen cycling suit from 1896 also in the Met.


Brown Wool Cycling Costume with Divided Skirt, c. 1896-1898, American, Brooklyn Museum Costume Collection at The Metropolitan Museum of Art, Gift of the Brooklyn Museum, 2009; In memory of Mrs. Arthur Rideway Ryan (née Katherine Browne) from her children, Katherine B. Ryan, and Marcella Burnell and Arthur Martin Ryan, 1983


 Althought I loved the strap details on the front and back of the jacket. I decided to leave them of the simplify the jacket and speed the whole process up.

While doing the research for this blog I came across a fascinating woman called Annie Londonderry,
the woman who cycled around the world in 1894. I won't go in to detail, just follow the link above if you want to know more or google her a bit, but I will share some pictures of her.


Here is a side by side comparison of both the jacket.
With on the left the jacket made with Past Patterns #113 
and on the right  Black Snail Patterns # 0715


After having worked with both patterns I think I can compare them a little. The Past Patterns Jacket was finished not too long ago but I started the project years ago and made a lot of modifications. I guess the main issue with the Past Patterns jacket is that I chose a fabric, heavy canvas,  which is too stiff for this project. It ended up very uncomfortable to wear, which probably means that I won't be wearing it, ever. The other problem was that I had a lot of problems with getting in the sleeves properly and that is why it ended up on the UFO pile in the first place.

The Black Snail pattern description was didn't have much pictures, which is for me a big handicap, as I am a very visual person. I find translating words to actions in general quite hard and it gets worse if it's in a foreign language. English is not native language which means that my brain has two types of translations to do at once. So pictures are very helpful for me. The description clearly has been written by someone with a lot of sewing experience because I sometimes felt I missed a step or two. On the other hand I did learn some great sewing techniques and gained some sewing knowledge.

I liked the sleeves from from the Black Snails pattern the best. The fullness of the sleeve is pleated instead of gathered.

The Past Patterns jacket has box pleats in the back which I like a little bit better than the V shaped pleats of the Black Snails Pattern.

If I had to choose between the patterns, I would choose the Black Snails pattern but that is mainly because it has the look I was trying to achieve in the first place. In the end both patterns have their pro's and cons. A combination of both would be great but I am not going to make one anytime soon.


And this cute little soutache braid decoration...

Is there because I accidently damaged the fabric after the whole jacket had been sewn. "Sigh!"

With only the buttons left to be sewn on this project is nearly done. Time to start sewing and costuming for fun again! Oh but wait...my son still needs a vest (gilet) to go with his new Belle Epoque linen summer suit and a jacket and  they need to be finished before the 13th of July. I am not allowed by my husband and son to try and make the jacket before the deadline. Probably has something to do with my unlady like behavior when I was working on my own jacket.


And because I am this corny and this big of a Queen fan:


Wednesday, 6 March 2019

A post on UFO's, alterations and repairs.

Hello Everyone, I haven't been bloggin for a while. That doesn't mean I haven't been sewing but I have been busy doing some costume maintance (repairs, alterations etc.) aka the boring stuff! Also I've been trying to reduce my UFO Pile also known as costume time-out pile. I have this bad habit of losing interest when a project takes too long or when I didn't make the deadline (event) for it. To prevent the UFO pile from becoming a hill I start each year with finishing/altering/repairing at least one costume.

Rescued from the UFO pile:


Past Patterns #113, 1899-1900 spectator jacket


Beige canvas jacket (made from our old Ektorp Ikea couch cover) based upon Past Patterns #113, 1899-1900 spectator jacket. I modified the pattern, didn't really know what I was doing and didn't write down the changes that I made. So I guess it's save to say that the problems I encountered where all my own fault. Overall I am happy with the result, although I wouldn't recommend using this thick quality canvas for clothing. To be honest I can't even remember when I started this project! I started working on it because we where thinking of doing a steampunk event. I got stuck at the sleeves and found out that I was not cut out to do steampunk. As I wanted to stay authentic, I couldn't come up with any original idea and I was afraid to end up with a "let's glue some gears on it and call it steampunk" costume. So the whole idea and the jacket got abonded.

Repairs/alterations (the boring stuff):


I have several chemisettes and pairs of undersleeves but I have to admit I am not a big fan of wearing them. So I sometimes sew the collar and cuffs to the bodice. This set I now also have tacked to the outside of the bodice to keep them in place. I don't know if it was done like this in the victorian era but I think it is a very practical short cut.

Same style bodice, different kind of job. Repairing a boning that is poking out. I once bought a synthetic fiber boning casing as it was all I could get in time. It's stretchy, hard to work with and the boning is poking through it. I don't think I am buying this stuff ever again 

There is this one project I am working on, but I am not doing it alone and it's not for me. Last year I helped one of my sons friends make a Doctor Strange costume. This time I am helping another of his friends make Porpetina's Goldsteins grey coat from the movie Fantastic Beasts and Where to Find Them. My son already has a Newt Scamander costume and now they want to Dutch Comic Con together as Newt and Tina. More on this project in the next blog post.


Wednesday, 19 September 2018

1920's Downton Abbey Garden Party style outfits

Some months ago we were invited to a wedding of friends with a 1920's Downton Abbey Garden party theme. On one hand I was thrilled I love any occasions to dress up especially in a historical outfit. On the other hand I was a little bit scared I wasn't going to make the deadline. It was an era we didn't have in our costume closet and I didn't want to cut corners by buying or renting costumes. The couple getting married are two of the people who inspire me to set the bar high on authenticity and quality. So I wanted us to look really good to honour this fact.

Last Sunday they got married and my husbands 3 piece suit was finished the day before around 17.00 pm. It was a nerve recking experience but this was the end result.


I could bore you to death with a the things I think that a wrong with my husband his suit. The whole thing was a challenge and a learning experience, and boy did I learn a lot! 

As I am not particularly fond of this square lowered waistline style dress chances are I won't be wearing my dress again any time soon and I took that fact in account when I made it. My husbands suit however is a whole different story. It cannot only be worn as a 1920's suit but could also work as a 1890's summer suit. This is the other reason I put so much time, energy, money and affort in it and I think he looks really smart in it!


I would like to make some changes to the costume before he wears it again. The trousers have to be taken in and (flat)lined to stiffen the horrible stretchy and saggy fabric. The linen/viscose mixture was a true nightmare to work with. I only found out it had viscose in it when I had washed the fabric but if we had know on forehand. We would still have bought it, it had the exact look my husband was looking for. Also I would like to make some changes to the vest and the lining of the coat. Eventhough it still needs work we both we really happy with the overall look.

I had purchased a roaring twenties dress pattern (butterick B6399) but found it needlessly complicated and time consuming. So I used a version of the 1920's one hour dress pattern on-line. I took more than one hour to make the dress but that was due to the lace inserts. The top dress is blue batist cotton with a separate blue silk sash and a (unfortunaly) synthetic lace overlay. Which had been part my stash doing nothing and looked really amazing with this costume so how could I resist.  Underneath I am wearing an off-white silk slip dress, which I also made with fabric from my stash. 

More information on my costume can be found here in a previous blog.


My husband his three pieces suit was put together with three separate patterns. The coat has been made with Butterick B6503 (aka Fantastic beast or Peaky Blinders suit). The vest was made with Folkwear #2222, Vintage vests and the trousers were made with Laughing Moon Mercantile #106, Late 19th century California pants. 


Wednesday, 28 February 2018

For the love of the Muff (part 3)

When I made my first muff in 2006, there were not many patterns available and very little information on the internet. I made a muff and cape set from an old faux fur coat from my husbands maternal grandmother.


Some years later, after purchasing this vintage/antique muff, I gave the cape and the muff to a friend.


When friends gave me a vintage 1950's/1960's polar fox stole (without head) I immediately knew I wanted to turn it into a white muff. To go with this jacket and hat! Although my trusty black muff looks quite well as well!


As I have always been happy with how my first muff turned out I used the same description which I found in 2006 floating somewhere on the internet.

"...I have some muffs from this period and they are made thus:
Make 2  tubes of muslin cut about 13/14" x21", one should be about 2" less
than the other.Stitch one end together and make a 3/4" chenille for elastic,
and fill with feathers (or you may opt for heavy poly quilt filler)Stitch
the open end; make a chenille as in the other end .
(you may wish to sew satin facings of about 6" oh each end of the inner bag
as the lining might show.
Cut and thread 2 pieces of elastic about 10" in the ends
Make a second (well, third) tube of fur, chenille, or other fabric of your
choice about 1" less than the tube already assembled, and cover the inner
piece.
Add a handle on one end, of silk braid or rope.
Embellish with tassels to taste...
"

I couldn't find the original source anymore but wanted to share this with you anyway because I found it really helpful. If you wrote this or you know who wrote this please let me know. I would be very happy to give you credit!

I did make some small changes when I made my second muff. For the first I used heavy poly quilt filler. To make this muff a little more historically accurate I used kapoc, a natural plant fibre. Which was oftend used in pillows and muffs. It has the added bonus that is not only more historically accurate but also warmer! 


The tubes where made from scraps of white cotton. The invisible one is striped, the visible one a nice satin weave.


I also decided to add a pocket. I had no idea how to do it and I am really bad at just winging it. So I decided to call in the cavalry in the shape of a workbook by Historical Sewing, the Faux Fur Muff pattern. I was very easy to follow and had very clear instructions, if you are thinking of make your own muff this would be a wise investment.

After putting the lining together it looked like this, in front of the lining is the polar fox fur.


You see that the tube has been filled but not sewn shut yet. Note: make sure you put in enough filling so that it can stand on a side without collapsing.


My new white muff turned out a little bigger than my vintage/antique black one. Although I suspect most of it is due to the fur being longer!


All in all it took about a week to complete this project and I am really happy with how it turned out!

Why the pocket in the muff, you might ask. It can be used for a wallet or a mobile phone but I use it to hold a hand/muff warmer.


My very small collection of vintage and antique muff warmers (small hot water bottles).

Unfortunately only one of them still works! The copper muff warmer leaks and the antique pewter muff warmer doesn't open anymore. And as hot water is in short supply at most of my Victorian themed events, I cheat and use a modern zippo handwarmer, which stays warm for 12 hours. This type of handwarmer was invented in 1923. 


Not just hot water bottles were used in the Victorian  and Edwardianera but also small charcoal burners, like these:

Visit for more information and pictures.


Interesting read.


Both are still available!

So Ladies no need for cold hands, let's keep them warm in style!


Wednesday, 6 December 2017

Back(b)log; Victorian brimless hat

As I am not a big fan bonnet I currently have I decided it was easier to make a new Victorian style hat than updating the bonnet. Starting fresh in my opinion is always easier and quicker than correcting a mistake or updating a project.


As the coat I am planning to wear on Saturday is inspired by this Winter image dating to 1874. The choice for a brimless hat aka pork pie or pillbox was easy. Especially when I found Lynn McMasters pattern on https://outofaportrait.com/.

I had been meaning to make this hat for a while, so I had already purchased the pattern. I had also some scraps red wool fabric and some fake fur from the coat left. And a piece of buckram from another hat project some years ago. So I was good to go! I traced the pattern, cut the pieces of fabric, lining etc. but found out that I didn't have enough strength in my hands to sew the buckram. Luckily enough my husband was sweet enough to help me out.

The buckram hat frame taking shape.

the buckram frame covered with mull and fabric.

Gathering my stuff. 
The finished hat with (most) of the costume.
Now where is my corset!

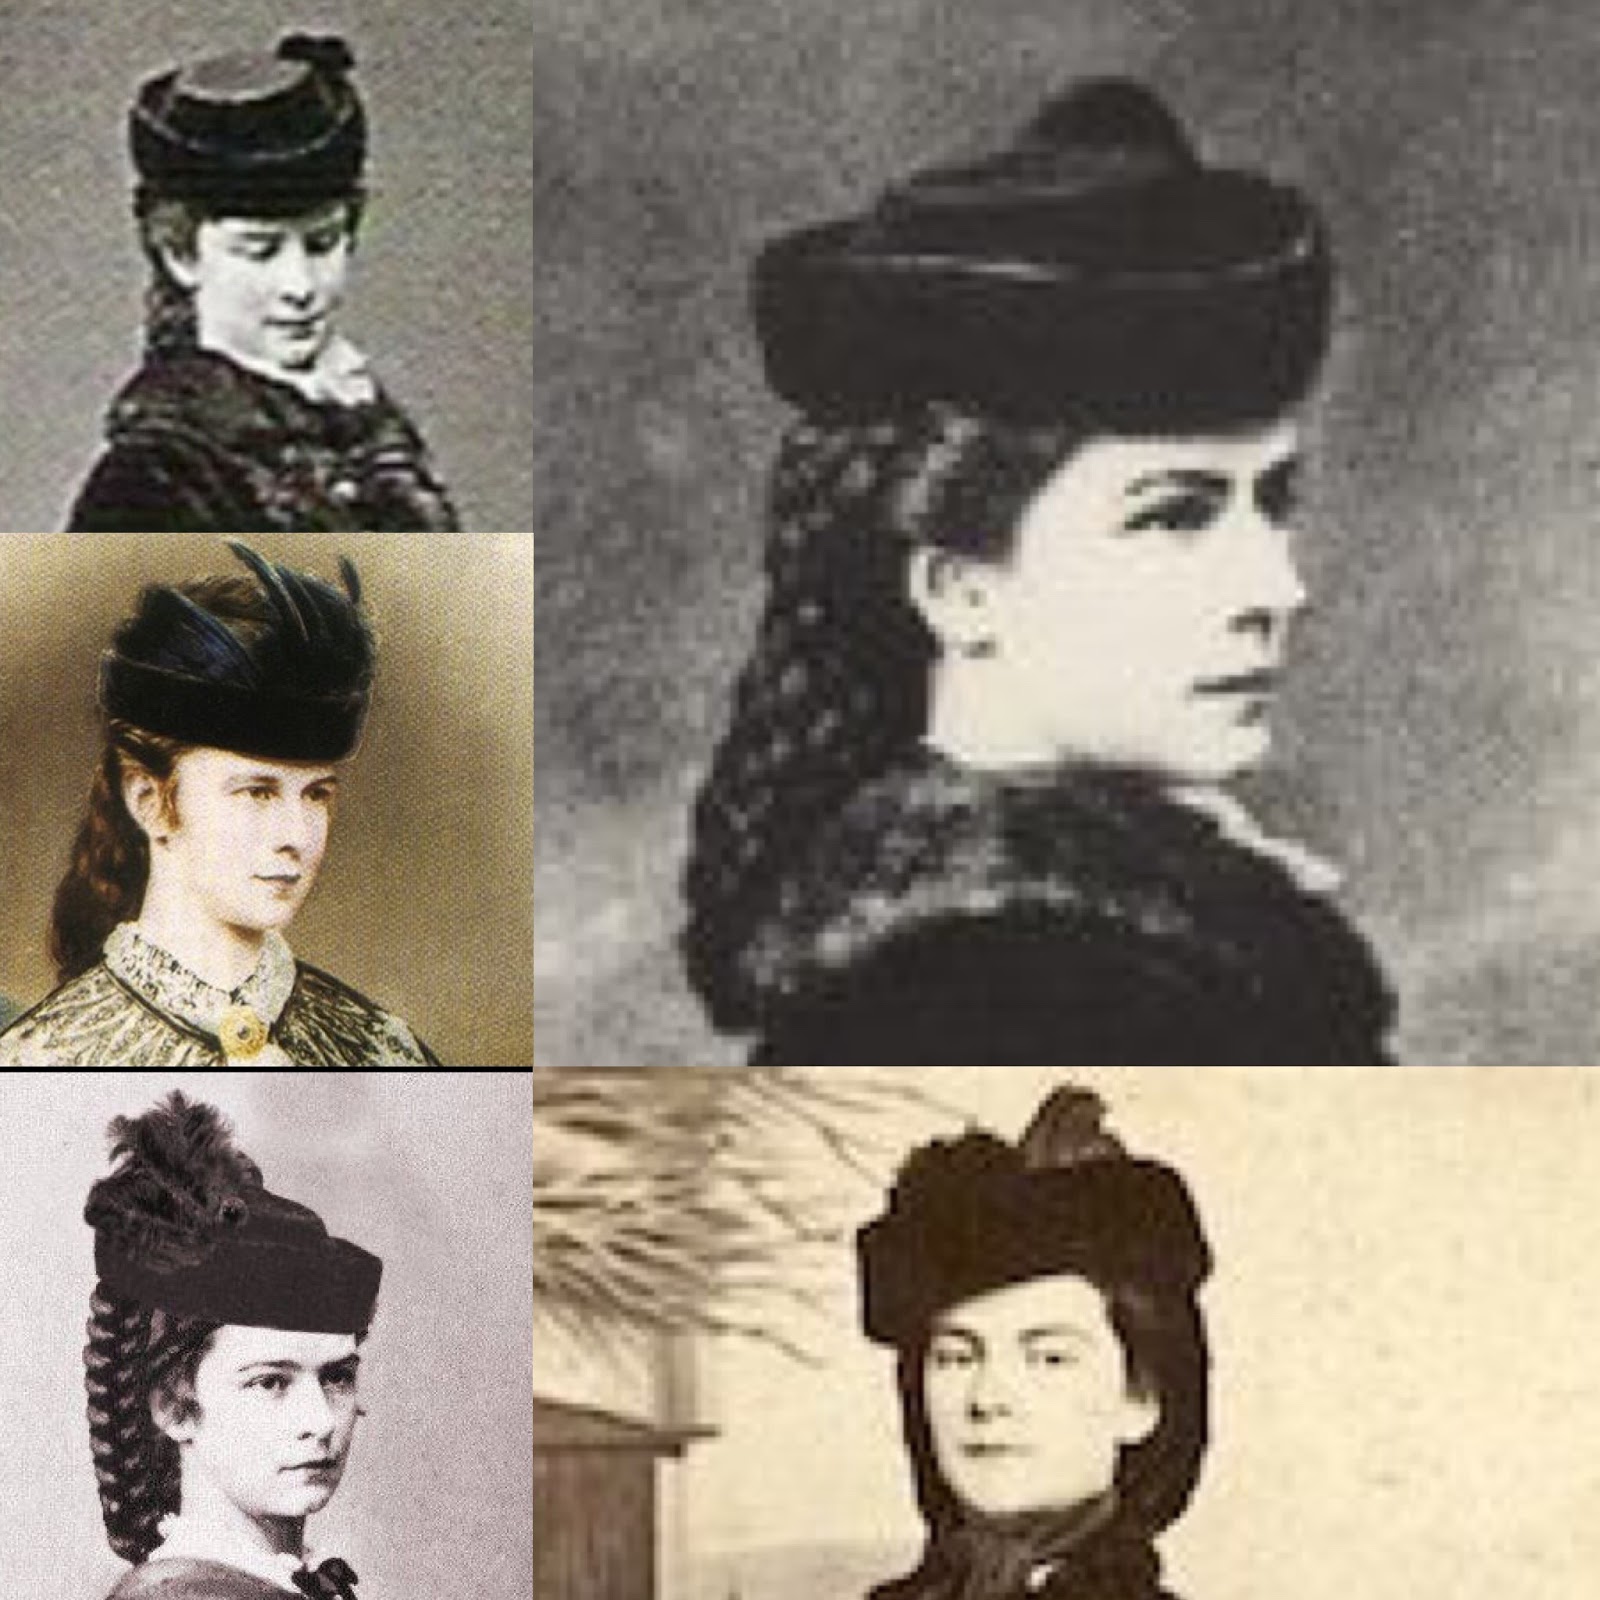
The choice for the brimless hat wasn't just inspired by the image from 1874. This style of hat was actually quite popular a little earlier in the Victorian era and had a very famous fan, Empress Elisabeth of Austria aka Sissi or Sisi.